Based on permissions given by ING admin or super user at your company, user can have corresponding access to archive features. This section covers following pages:
Archive Admin
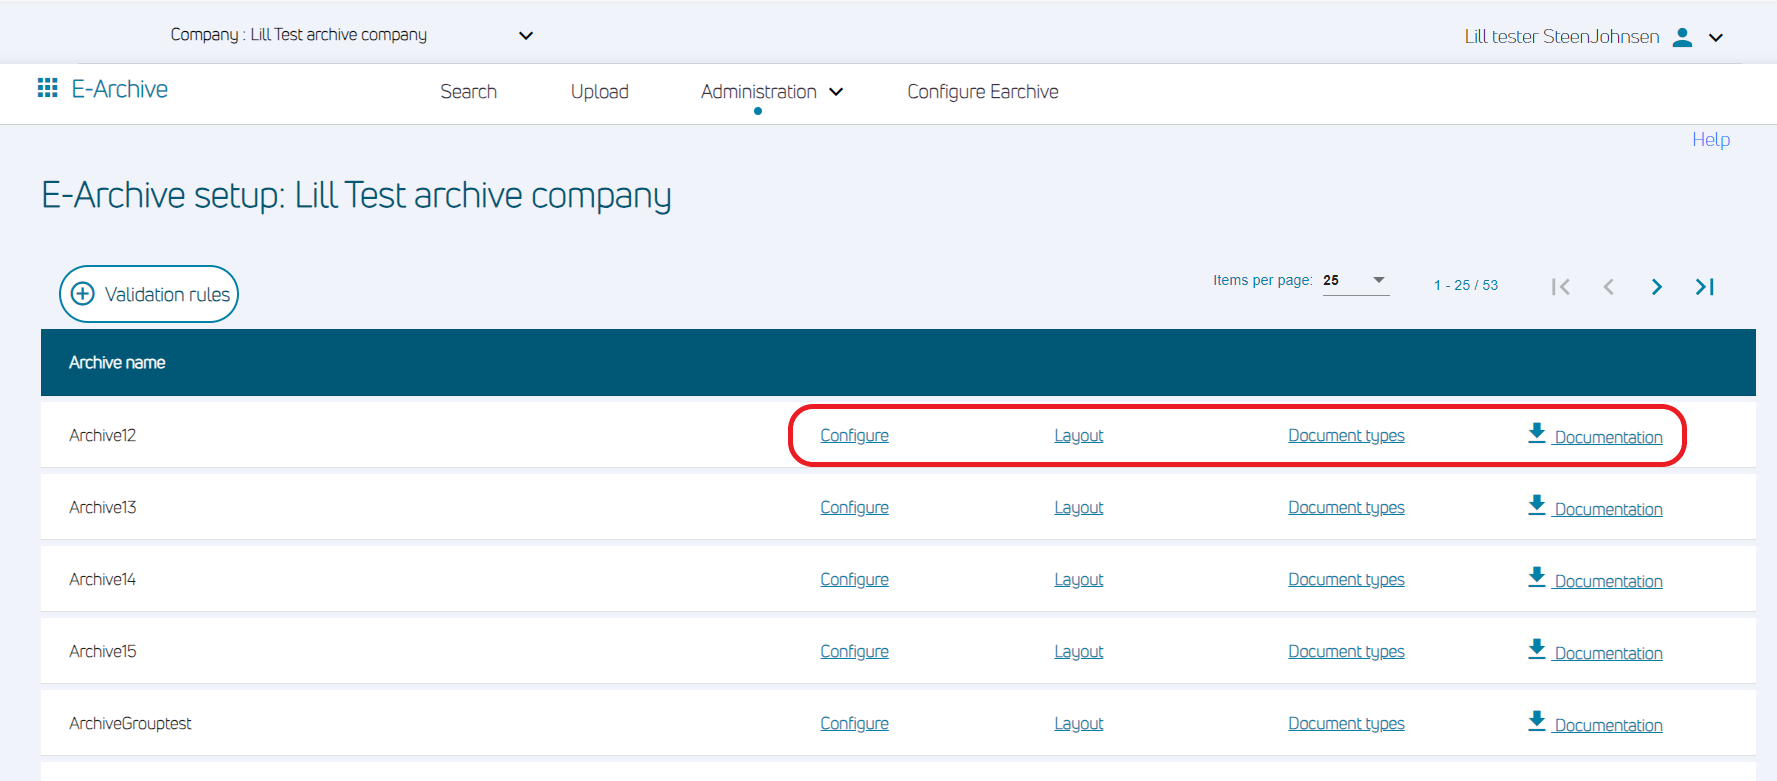
When ING admin has created the archive, it will appear in Archive admin page and you can administer the E‐Archive configuration here; Configure, Layout and Document types. On click on Validation rules button you can create your own validation type with your defined set of rules. This will be similar to other types like string, numeric, date etc. and will validate value with rules that you configure. E‐Archive supports enumeration (predefined set of values) that you can create and configure to one or more indexes in an archive as a validation type. Enumerations can be updated at any time, however, used references cannot be removed.
Configure
On click of link Configure, a new page appears and here you can check/uncheck for Extended access control. It is possible to set up extended access control in the archive so that only users with the right access level can search, upload and see related documents. Connections between users and access roles are set in user admin or by ING admin.
You can configure retention and purge dates. In E‐Archive, documents are stored with a given lifetime (which can be infinite). Once this has been reached, the documents are physically removed from the archive. Documents can also be deleted ahead of this time. They will then be marked as deleted, but stored in the archive for a configured period of time before they are removed. This period can range from days to years. During this period, it is possible for an administrator to recover the documents. Once the documents have been physically removed from the archive, recovery is no longer possible. The retention parameters allow you to configure lifetime for stored and deleted documents. The settings will determine the purge date (expiration date) for the documents stored in the archive. Once the purge date is reached, the documents will be physically removed from the archive. The retention parameters can be set both for the archive itself, and for each single document type. The document type has precedence, so if a parameter is configured for a document type, this will override the same setting in the archive configuration. If it is not set on the document type, the setting for the archive will be used. The purge date of the document is calculated when the document is first stored, and only re‐calculated when a change happens to the document of a kind that normally causes a change to the purge date. This means that if you change document type for a document, or you delete or un‐delete it, then the purge date will be recalculated. If you, however, update only the settings on the document type or archive, existing documents will not be updated. The new setting will be used for new documents and for recalculations of purge date on existing documents when that is triggered by one of the above actions.
|
Document lifetime |
The amount of time from a document is stored until it is physically removed from the archive. Document lifetime is optional. If this is not configured, a stored document will never be purged unless it is deleted. |
|
Purge after delete |
The amount of time from a document is deleted till it is physically removed from the archive. Purge after delete must be specified. Deleted document will be removed from the archive after spending amount of time configured here. The time period specified for 'purge after delete' can be the same or less than 'document lifetime'. When a document is deleted, the first purge date will be used. This means that it is possible to shorten the life time of a document by deleting it, but it is not possible to extend it. |
Indexes
Indexes are text fields related to each stored document. The archive has two variants of indexes ‐ system mandated indexes that needs to be present in every archive, and archive specific indexes that can be configured by the customer. An archive can have up to 20 archive specific indexes. Note that E‐Sign integration will mandate the use of some of these indexes for E‐Sign specific values.
|
|
Description |
|---|---|
|
Index name |
The name of the index. The Index name is the canonical identification of the index. It cannot be modified once the index has been created. |
|
Required |
A value for the index has to be present when storing a document, and at least one value needs to be present at all time.
|
|
Searchable |
A searchable index may be used to search for documents. One or more indexes may be used to search for documents.
|
|
Modifiable |
The value of an index may be changed at a later time. |
|
Type |
A type of value an index should accept while storing document. The following types are allowed:
You cannot modify the type for the System indexes Maximum length is 100 You can change non‐string type to string, however, reverse is not allowed. Only permissible modification will be non‐string type to string. For example, numeric to string is allowed, however string to numeric and date to numeric are not allowed. You can define custom validation types(predefined set of values). Type starting with '*' represents custom validation type. Read more about Validation rules below. |
|
Length |
A min and max length value an index should accept while storing or modifying the document. You can decrease the minimum value however you cannot increase during archive modification. You can increase the maximum value however you cannot decrease during archive modification. |
|
Max Allowed |
Number of values an index can accept. You can increase the number of values at any time, but you can not decrease it. Max number of values can be 99. |
Standard E-Archive indexes
|
E‐Archive index |
Description |
|---|---|
|
customerId |
Can be used to store the associated customerId (social security number / organization number) related to the document. |
|
description |
Can be used to store description of the archived object. |
|
documentDate |
The original date of the document |
|
documentGroup |
The document group associated with the document |
|
documentId |
Unique document identification |
|
documentType |
The document type associated with the document |
|
externalRef |
Used to store the orderId from the E‐signing order |
|
fileName |
Used to store the filename when uploading a document |
|
mimetype |
Indicate the type of data that a file contains |
|
source |
Indicates who (person/machine/system) has archived the document |
|
shemaVersion |
Archive internal index |
|
esignPortalUser |
Used by ING Trust Portal to store information about the user who initiated the signing order (Earchive special index) |
|
endorser |
Used for storing unique endorser number from Nets data scannings center for retrieving original scanned paper documents. (Earchive special index) |
Layout
On click of link Layout a new page will open, and you can customize the layout for users. Here you can configure your own layout by providing which indexes should be visible in the different views of the portal. You are able to edit the visibility for instance in the search, upload, and result pages. It is also possible to have custom names on all the indexes displayed to the end user. You could use the draggable interface to arrange the indexes the way you want to display them.
|
|
Description |
|---|---|
|
Index name |
Display the actual index name. Non editable field. |
|
Display Name |
Name to be displayed to user and will be visible in archive template & create order. Field is modifiable. |
|
Search page |
Check/uncheck if the specific index should be shown at search page |
|
Result page |
Check/uncheck if the specific index should be shown at result page |
|
Detailed page |
Check/uncheck if the specific index should be shown at Detailed page |
|
Upload page |
Check/uncheck if the specific index should be shown at upload page |
Document types
To create or edit document types, click the “Document types” link. A new page will show, and you can create your own
document groups by clicking "+" icon (Add new group) It is also possible to load pre‐defined document types by pressing “Load” button. Then you will get a list with prefilled document groups and types. You have to save the document group first in order to be able to save the document types.
When you click “Add new group” you can use the ID number suggested by the system, or use your own values, enter a Group name and press “save” icon.
After you have created a document group, you can create the document types for this document group by clicking the “+” icon (Add new type). You can see all documenttypes for a documentgroup by expanding the documentgroup. Fill inn “Type name” and then click “Save” icon. You should only fill inn “Document lifetime” and “Purge after delete” if the documents belonging to this Document type has special rules. Create the document types belonging to the document group one‐by‐one. You can delete a group, but if the group contains a type, you need to delete that first. If the type is in use then cannot be deleted unless it is empty. Deletion is done with the “Delete” icon.
Documentation
By clicking the "Documentation" link you can download a PDF documentation of your archive configuration.
The PDF file is downloaded to your computer containing these five sections:
-
Archive Indexes
-
Archive Rules
-
Archive Validation Rules
-
Validations
-
Document Groups and Types
Configure access control
It is possible to give access for specific archives, document groups and types, for specific users. This secures that only users with the right access control role can search and see the related documents.
NOTE: If the archive is enabled for extended access control all users must have an access control role to retrieve documents from the archive.
To create roles and access for an archive, follow these steps:
-
Go to Administration->Archive admin and press link configure for the specific archive and check for "Extended access control" and press "Save" button.
-
Go to Administration->Configure access control, choose "Create new role for access" and add role name. Then choose "+" icon for the archive you marked with "Extended access control" above, and choose document group/type and search/update/delete and then press "Create". The access control role is now created.
-
Go to User administration->choose the user you want to give the extended access control and press edit icon. Here the role you created will appear and you can connect the user to the specific role and then press "Save"
You can also edit an existing role, or delete a role.
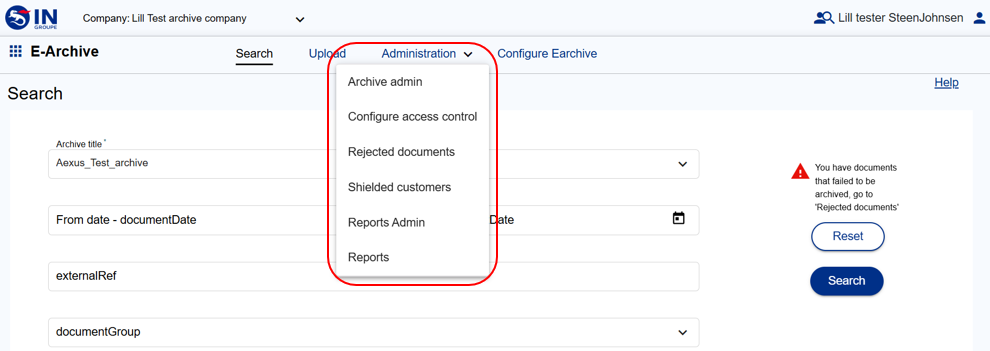
Rejected documents
At Search page you will see a red icon (text by mouseover: You have documents that failed to be archived, go to Rejected documents) when the archive contains rejected documents. Rejected documents are documents that have been rejected by automatically archiving because the metadata information doesn’t match the archive setup. The documents are stored for manual handling.
For correction, choose menu item "Rejected documents" and a new page show with more options. Here you see an overview of all rejected documents and you can search by order ID. The page contains a list where you can display which date the rejected documents is received, number of rejected documents and how many documents which is in process of being corrected. You could also view the rejected documents, or start correcting them.
On click on “Start correction” the system will start on the first rejected document in the list or click on edit icon at a specific document and you will be presented with the option to start correcting the rejected document and to store it in the archive.
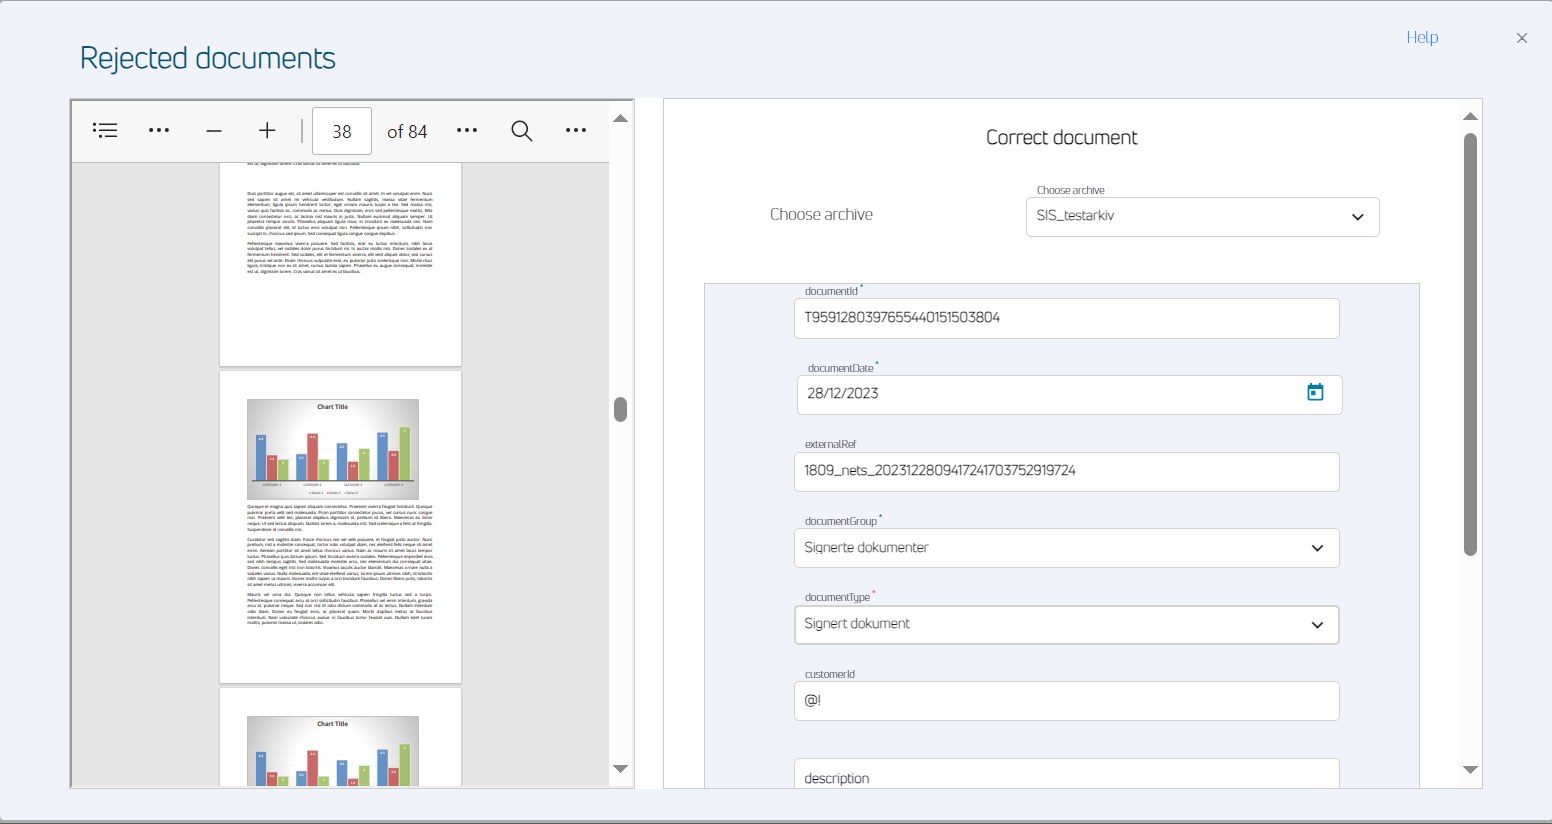
To have the rejected documents stored in the archive, you need to fill out all the required fields and click the button “Store and next”. If all the necessary information is provided and the operation is processed ok, a message will be displayed saying: “Document stored to archive”. It is also possible to save a draft of the work you are doing so you can go back and correct it later. In addition, you could also skip correction of this document.
Shielded customers
E‐Archive offers the possibility to shield customers. To shield a customer, go to Shielded customers menu item.
Only users where the attribute for the shielded users are set, will be able to register shielded customers and see documents to customers that are shielded. Examples for shielded customer could be member of the royal family, politicians or other people of great public interest.
The customers you would like to shield needs to be entered with their customerIds in this screen. Please note that there cannot be more than one customerId on each line. Click save when all shielded customers have been added to the list.
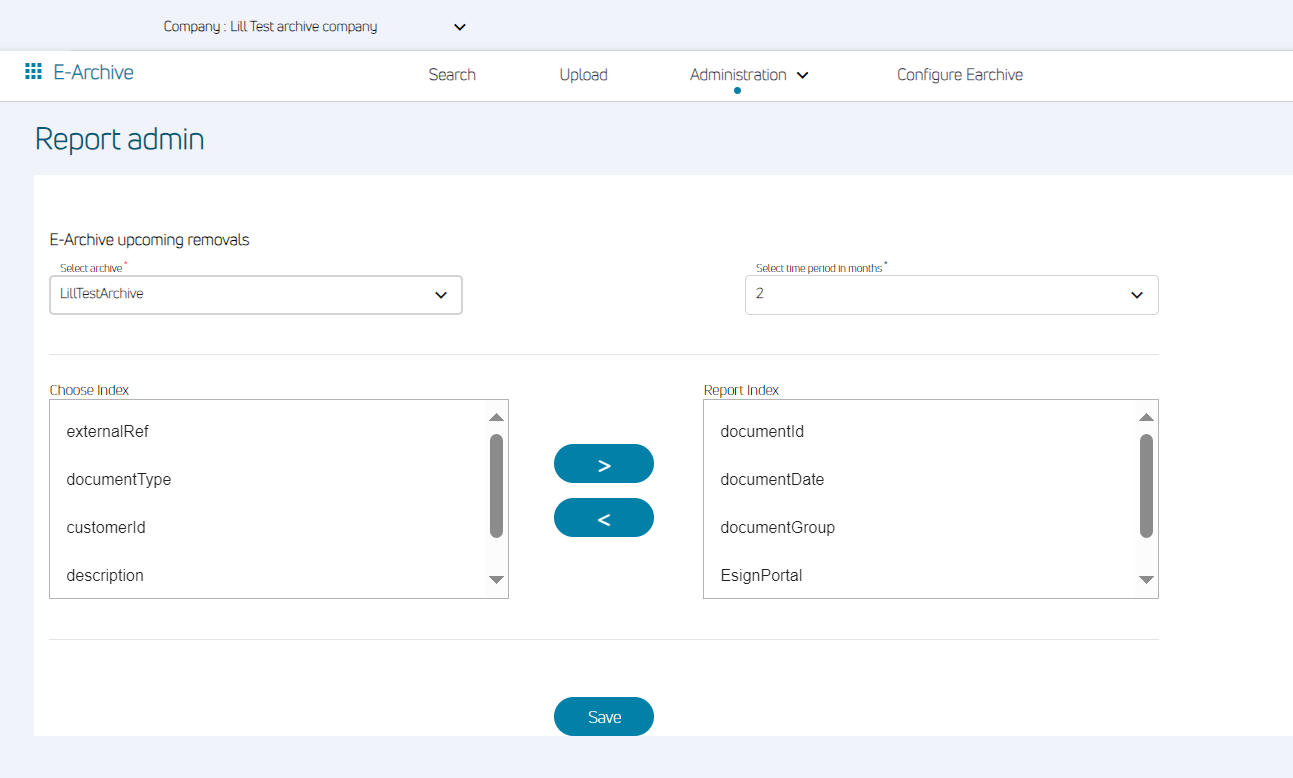
Report admin
When clicking the menu item Administration and then Report admin, you will be directed to your companies archive’s reports administration and are able to configure the reports. In dropdown, select the archive for witch you want to configure the report “E‐archive upcoming Removals”.
When archive is selected, you can specify which indexes to see in the report and you can also specify how long time period the report shall show. Click “Save report setup” when finished.
The new report setup will be used the next time the report is generated.
Reports
As a standard setup this report provides details of the documents which are going to be permanently removed from the archives within two months.
View list of all reports in the dropdown and you can select the appropriate report. Optional and Calendar will show past 3 months date until current date for selection.
You can perform date search based on the dates selected in From-To dates. Optional and By default, no report is selected, and it displays all the reports details in the below overview table.
On click of Search will display all the results based on the search criteria
Downloads the report by clicking the Download icon. The report displays the total number of documents (SDO, DELETED and Total which are available in the archive also showing the total document volume (in MB).