A signing order is an assigned task for one or more Signers to sign. If the document need more than one signatory, you can choose between parallel or serial signing. Examples of documents are contracts or transaction documents requiring an approval or commitment in the form of a written signature or equivalent. Electronic signatures are in this context considered equal when compared to written ones.
This section describes how to create a signing order and you can find these topics:
Group, order name and deadline (Step 1)
Group, order name and deadline (Step 1)
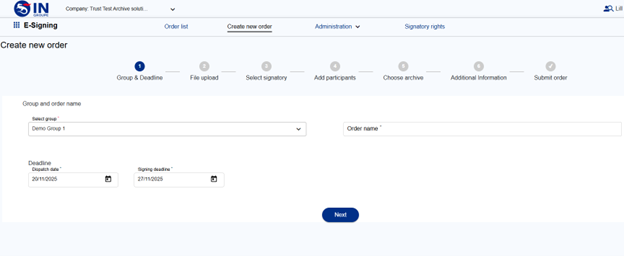
Go to menu item Create new order. Here you choose Group and give Order name. If the group has no email templated assigned for the type "An order is created", you will not be able to create order for that group. Once the superuser of your company has assigned the group with order created template, you are able to create order for that group.
If your superuser gives permission, you can also override the dispatch and due date. The superuser can set the dispatch date (default selected to today’s date) and signing deadline to a default setting, in which case you will not see this option. If not, you can change the deadline date. Deadline date cannot be more than 90 days after dispatch.
Then click “Next”.
Mark, the feature auto populating the order name now is removed. You always must enter order name
File upload (step 2)
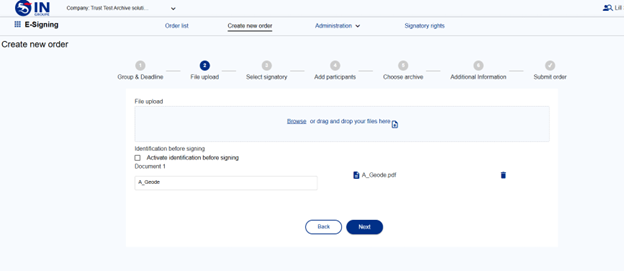
At this step you add the document/s. To select document, click on “browse” to upload the document that you want to be signed, or drag and drop the document to the box.
If the Superuser has enabled "Allow multiple documents", you are able to add more documents. You can then create an order including max 7MB per document and max 20MB per order. There is a restriction, only one PDF Form is allowed. Uploaded file name is displayed as document name. The document names will be displayed for the signers in signing process.
If your superuser gives permission, you can also choose if the signer needs to identify before reading the document. If the "Identification before signing" option is enabled and set to mandatory or off by Superuser, you will not see this option. National ID number is optional to enter at step 3 unless "Identification before Signing" is used.
If the selected document is a PDF with form fields document (configured by superuser at Settings), click for this at the checkbox and fill out the field for PDF form instructions. The instruction field is a mandatory text field that will be displayed above the PDF Form in the signing process, and it can be used to inform the signer about what to do.
Then click “Next”. Clicking back takes you to Step 1, at every step from step 2, clicking on back will take you to previous step.
Select signatory (step 3)
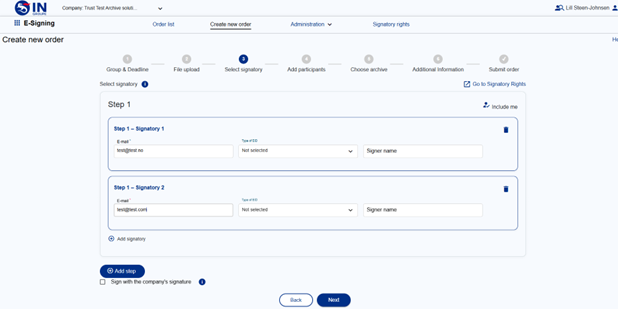
Here you add the signer/s and choose eID to be used (if you have more than one available) and add steps, if required.
In this section, all Signer information must be entered. You can choose between serial or parallel signing of the order. If your Company has support for multiple signatures, you will be able to add more signers by clicking “Add signatory" or "Add step" button. This will allow the document to be signed by multiple Signers. The signers are required to sign the document according to the steps they have been added (serial signing). The signers at the same step are allowed to sign in any order (parallel signing).
E-mail address for each Signer must be entered. eID for each Signer is optional to be entered, you can let the signer choose as well, if your company has more eIDs attached. You may also be allowed to enter National ID number for each signer. You are responsible for making sure each Signer’s name, e-mail address, eID Type and National ID number match. National ID number is optional unless "Identification before Signing" is used (see step 2). Always include national ID number if you want to be sure that the document is signed by the correct persons.
Signer name is optional to enter. Mobile number will show if it is enabled for your company. If you enter the signer's mobile number, the signer will be notified that it is an order to be signed. In addition, if the caseworker registers with mobile number, we will notify when orders are signed.
The identification data is different for the different eIDs you select. For BankIDs, Signer ID will be National ID, MitID(CPR), MitID Business (CVRRID or PPI) Passport reader (passport no) and Verimi (verimi account). For One time code you need to enter first name, last name and telephone number (country code is mandatory). For One time code the Identification details are always mandatory.
Company signing is offered as an option. You may not see this option, in which case you either a) don’t have access to Company signing, or b) a Superuser in your company has set the option to mandatory. Select this option if you want to sign the document with your Company Signature.
Then click “Next”. At every step from step 2, clicking on back will take you to previous step.
Add participants (step 4)
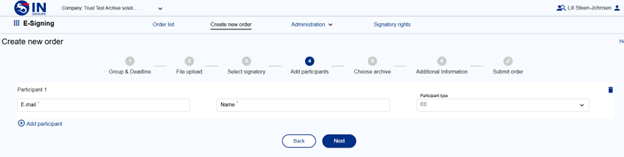
Here you can enter email addresses to whom you want to send the signed document, if someone else needs to be informed. This is optional – if not needed, then click “Next” without adding any data at this page. If superuser has configured the portal to not add participants, then this step is not shown.
Then click “Next”. At every step from step 2, clicking on back will take you to previous step.
Choose Archive (Step 5)
Here you choose and enter archive details, based on archive setup for your company. If your company doesn’t have E-Archive service, this step is not shown.
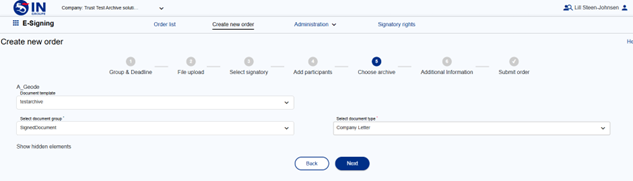
If your company has access to ING Archive, you need to select some archive related information like:
· Archive Name
· Document Group
· Document Type
· Indexes
Some or all this information may already be set and locked to default values by the Administrator.
The input parameters here will vary, depending on the archive configuration and if your Administrators have created a template to be used for you.
If a superuser has set the use of Archive Templates to mandatory without the use of a default template, the uploaded document must match the name of one of the created templates. If the document name does not match, an error message will be shown.
Then click Next. At every step from step 2, clicking on back will take you to previous step.
Additional information (Step 6)
At this step you add additional information, based on which details the superuser has configured for you. If superuser has configured the portal to No personal message to caseworker and No message to signer, then this step is not shown.
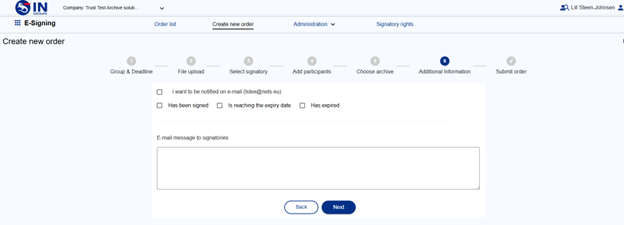
If the superuser has configured for it and the email templates are enabled (for internal recipients), the caseworker can request notifications for 3 events
· Order is complete
· Order is closed to expiry
· Order has expired
Message section
If a superuser has allowed the use of personal messages for signing orders, you can choose to include a message to the Signer. This message will be included in the e-mail message sent to the Signer. Superuser is responsible for defining a suitable place for insertion of this personal message using email templates for notifications.
Then click Next. At every step from step 2, clicking on back will take you to previous step.
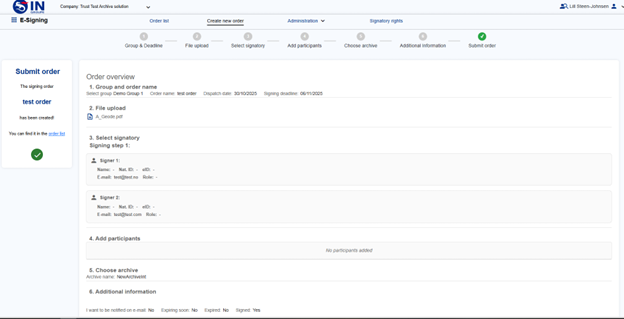
Submit order (step 7)

Last step, here you get a summary of all details you have added in the order creation. If you want to change something, use the edit button (pencil) for the correct step, and go directly to the step and do the change. Then you press “Next” or “Go to submit” and when everything looks good, click on “Submit” and the order will be sent out.
When the order is submitted, you will get the page below. To create a new order, click on “Create new order” in top menu. To see details of the recently created order, click at the link “Order list” or choose “Order list” in top menu:
Order list
The Order List page will show an overview of numbers of orders in each of the five different statuses, in addition to "All". By clicking at the status at the top menu, all order details will show for the chosen status. Only signing orders belonging to a group you have write or read access to will be shown. Here are the different statuses:
-
Signed
-
Sent out
-
Not sent out
-
Expired
-
Cancelled
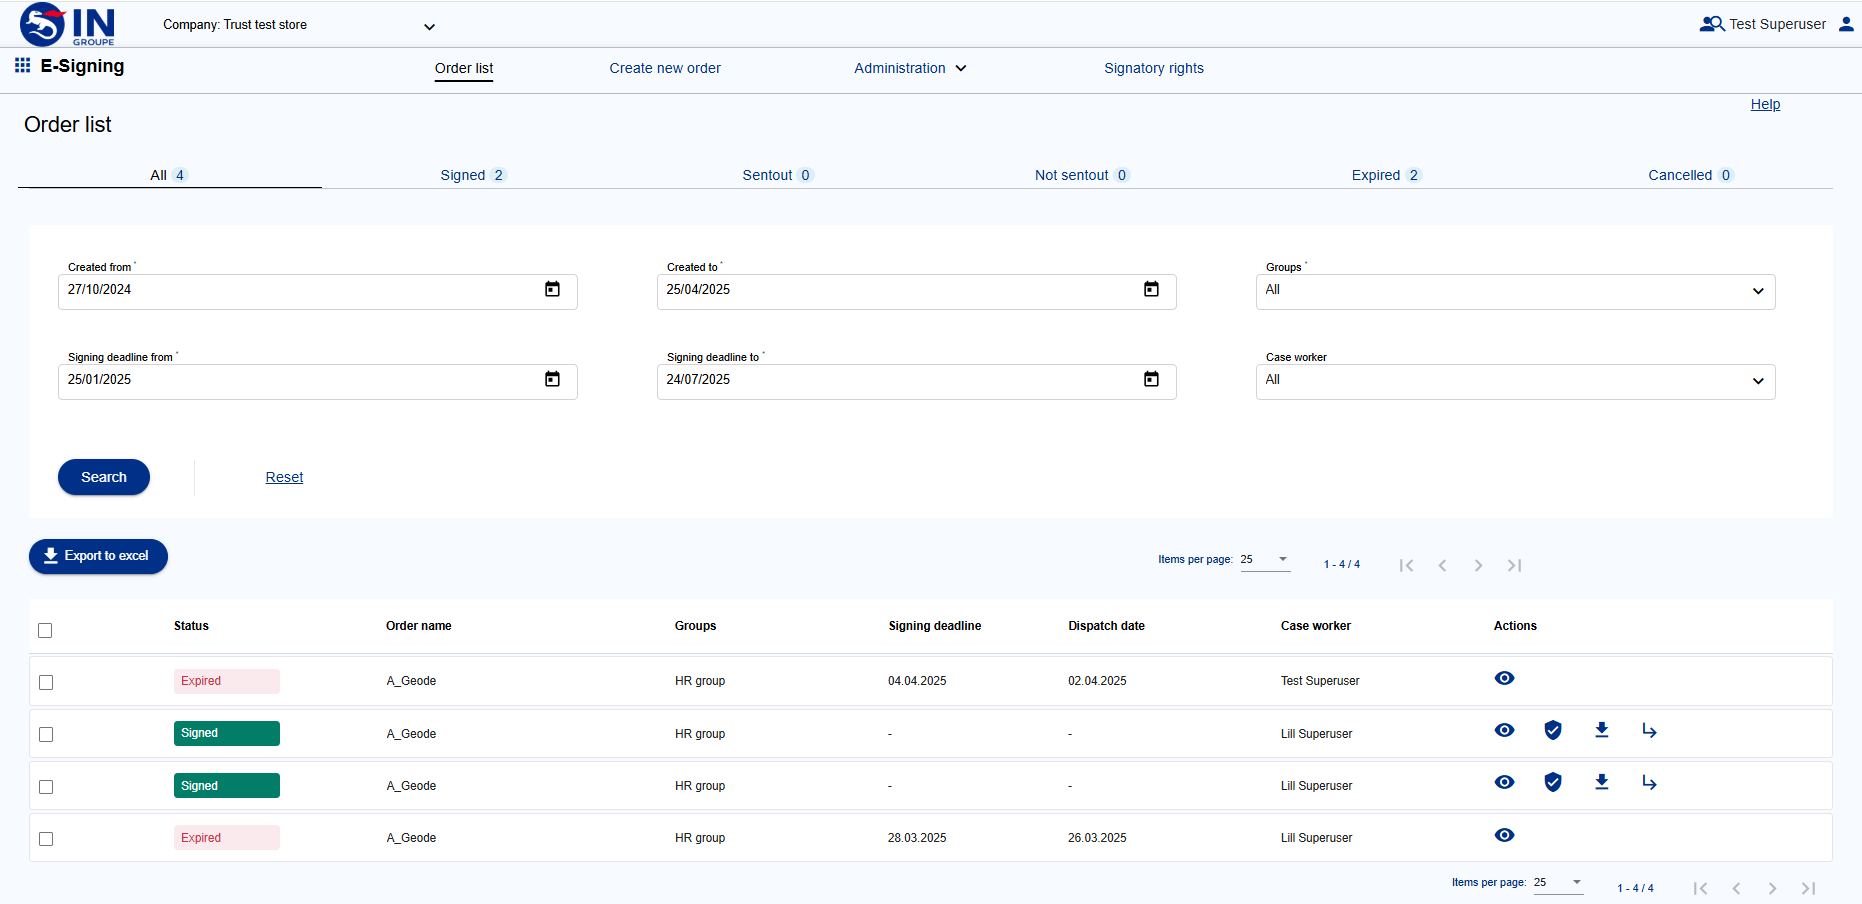
At any point of time after a signing order has been created until it has been deleted, it will be listed in exactly one of those 5 statuses. Each signing order in a status list will display the order name, group name and name of the User/Case worker that created the order (“Created By”) in the three first columns. Other columns will vary depending on the type of order list and market configuration.
The following sections describe the content of each list and which actions are available for the lists.
Filters
At the top of the order lists there is a filter menu with several filtering options. If the number of orders in the list is high, the filters may be used to locate specific signing orders much faster. The following filters are available:
Show orders dispatched between specific dates
Show orders with signing deadline between specific dates
Show orders for all groups or only for one specific group
Show all orders or only those created by one specific User
Only show orders for the organization with a given name (For Corporate marked configurations only)
Only show orders for the organization with a given organization name (For Corporate marked configurations only)
Use the “Search” and “Reset” buttons to either activate or reset the filters. Click on the “Export to excel” button and excel file will be downloaded.
Signed
When all Signers have signed an order within the signing deadline, the order will be listed in the Signed list.

Clicking the eye-icon you will see details of the order. The E-Signing Portal is integrated with ING E-Signing Validator service. This service is available using the “Validate” icon, and will show the result of the signature validation process within your current window.
You may download signed documents for a given signing order using the “Download” icon. Documents are available for download for up to 90 days after signing, at which time they are deleted. Choose between PDF or SDO. After 90 days you can still see details and history related to the order and download the original document. After 180 days all is permanently deleted.
If your Company has access to use National ID numbers in signing orders, you will get these options if you choose to download Signed PDF :
Include SSN: SSN for all signers will be displayed in an extra line in the Signed PDF
Hide SSN: SSN will be removed from "Identifier" for those eID's where this is SSN (BankID SE, FTN)
If your Company doesn’t have access to use National ID numbers you will not get the above options and the “Hide SSN” option will be used.
At the right side it's an icon for Repeat the same order. By clicking this, you can create a new order with the same signers as in the original order, just add new documents.
You may permanently delete an order by clicking check-box for the chosen order, and then click “Delete chosen order(s)”. You will get the question “Are you sure that you will delete 1 order(s)” then click yes to delete. You can select multiple orders and delete them permanently in one step. This is available for the signed, expired and cancelled order lists.
Sent out
The Sent Out list includes signing orders that have been created and dispatched to the Signer(s) but not yet signed by all signers.
Clicking x-icon will cancel the signing order, causing it to be listed in the Cancelled list. The Signer(s) will no longer be able to sign the order if it has been cancelled.
Clicking eye-icon will send you to a new page with detailed information about the signing order. You will be able to view and edit the following information:
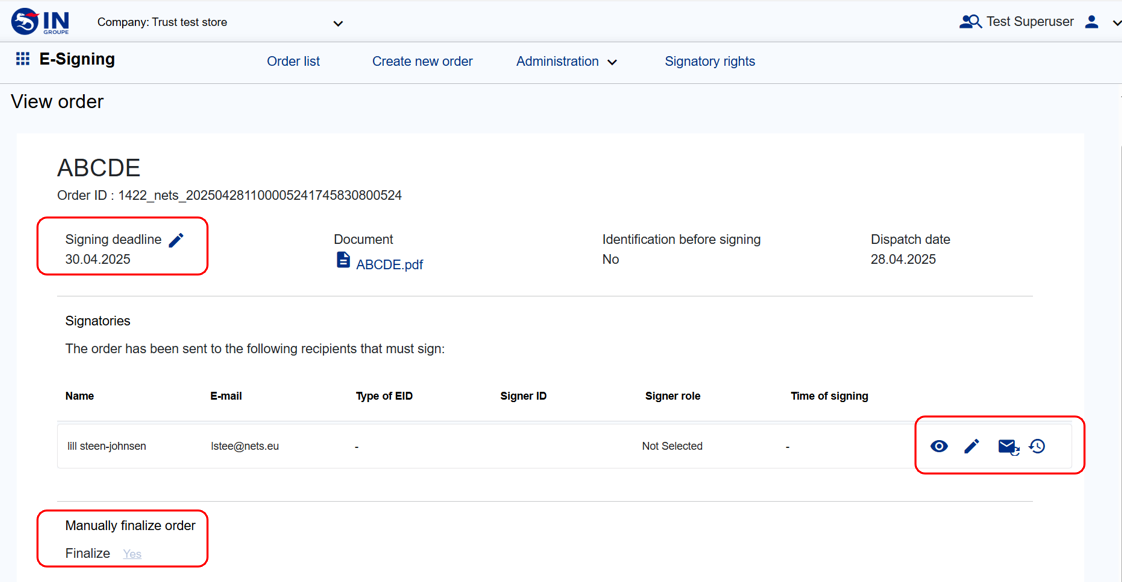
Change signing deadline: If needed you can change the signing deadline.
Manual finalize the order: If at least one of the signers has signed, the caseworker can manually finalize the order.
Time of signing: will show the actual time of signing. If the order is not signed by all the signers, new action buttons will show.
-
The eye icon will show details of the time of signing or time when the signer opened the link.
-
Edit button will open a pop up where the case worker can change the email address and send the order to someone else.
-
Pressing the resend button will resend the email with the signing order to the recipient, this will only work if the order is unsigned.
-
Clicking on the Signing history details will show any changes done
In addition the page show detalis of the order like general order details, archive details (if used), Signer(s) details, personal message to Signer(s) (if any). You may return to the Sent Out order list by clicking on “Back”.
Not sent out
When a signing order is created with a dispatch date in the future, the order will be listed in the Not Sent Out list until the time of dispatch. Just like for the Sent Out list, you may click “eye-icon” to see order details of orders not yet dispatched. Clicking “x-icon” will cancel the signing order causing it to be listed in the Cancelled list.
Expired
A signing order has an expiration date (signing deadline), set at the time of order creation. The Expired list will show signing orders not signed by all Signers before the expiration date. Just like for the Sent Out list, you may click “Eye-icon” to see order details of expired orders. In order to delete any expired signing order, you must first cancel the signing order, and then click the “Delete” button in the cancelled signing orders list. You can re-activate an order that has expired by change signing deadline, and then re-send email with the order for signing. At Order list page, go to the expired order and choose View, here you will see the option to change signing deadline.
Cancelled
Any order that has been cancelled will be shown in the Cancelled list until it has been deleted. Just like for the Sent Out list, you may click “Eye-icon” to see order details of cancelled orders.
You may permanently delete any cancelled signing order by clicking the “Delete” button.