This section describes how to configure the Trust Portal Signing service for your company and it's only relevant for Super Users in Signing service. You will find the configuration options in menu item “User administration” at upper right corner and "Administration” menu item in the main menu at the top.

E-Mail templated for Notifications
Add Users and groups
In order to create a signing order in the Trust Portal, a person/caseworker must be registered and assigned write permission to one or more groups.
Groups form the basis for separation in groups within a company. Groups within the Trust Portal have the following properties:
-
Any signing order will belong to one specific group.
-
A User may be defined with one of three possible permissions for a given group:
-
Write: User can create, view, and change signing orders belonging to the given group.
-
Read: User can view signing orders belonging to the given group
-
None: User have no access to create, view, or change any orders for the given group (while creating users we have none but in group setup only read and write)
Users
A user can be registered in the Trust Portal with National ID No (SSN), CVR and RID, PPI or email and password.
Add new user with National ID No. (SSN) or CVR-RID
Go to menu item in upper right corner and click on “User administration”. Then press the button for “Create new user” and a new page will show. Fill out information about the user and select “Create”. “Reset” will clear the form without saving.
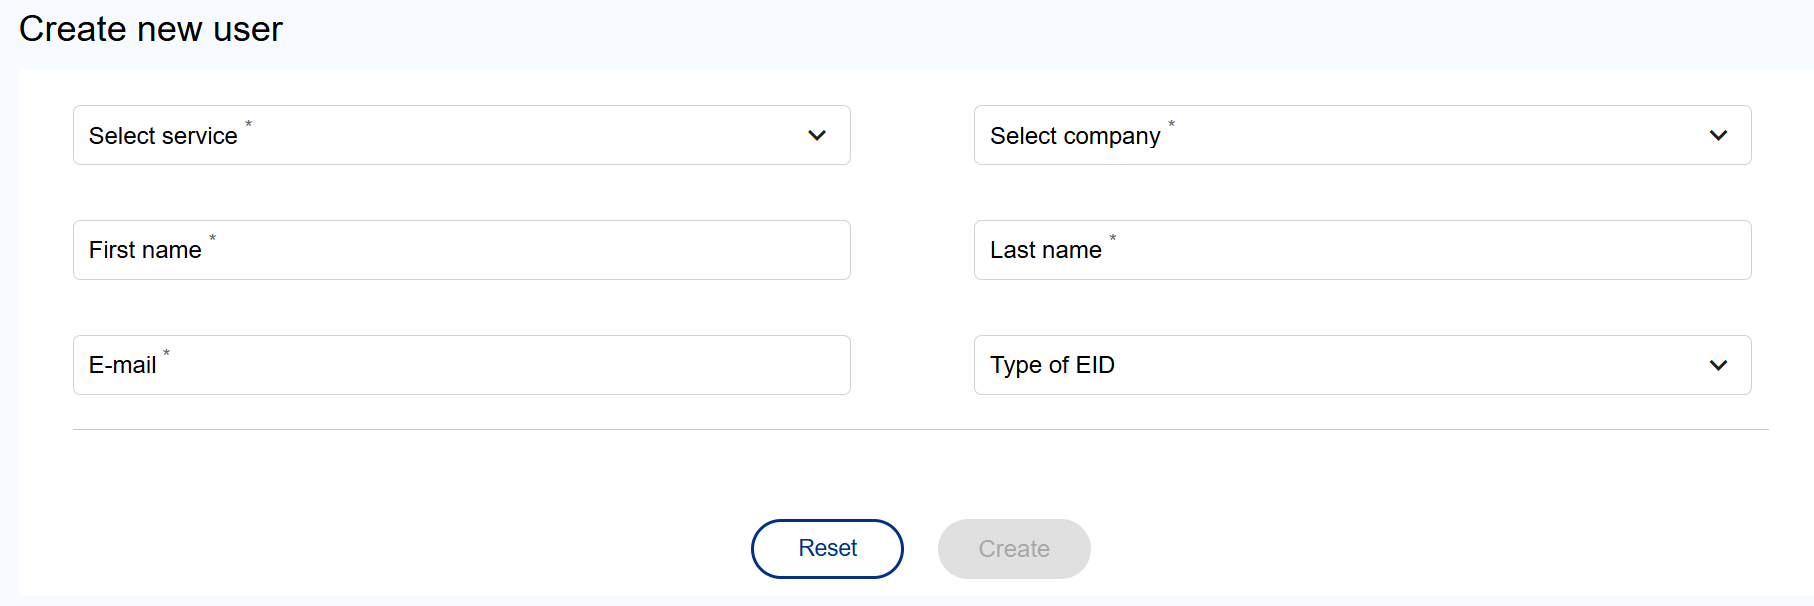
The following information must be filled out for a new user:
-
Select service and company
-
First name
-
Last name
-
E-mail address (must be unique)
-
Select type of eID
-
National ID number or CVR and RID (based on chosen eID)
Based on which type of eID chosen, you will be presented different fields to fill out. Note that if your company has no access to login with Country Specific eID, it's not mandatory to fill in National ID or CVR / RID fields while creating a user.
-
Register a new user using National ID: National ID number is the User’s identification number, referring to “Fødselsnummer” in Norway, “Personnummer” in Sweden and “CPR-nummer” in Denmark.
-
Register a new User using CVR and RID: CVR and RID is the Employer ID and Employee ID used in Denmark. In additional if you choose eID MitID Business, you also need to fill out the users PID number. This number you can get from MitID.
Create new user with option to log in using Login with Username/Password
SSN and CVR/RID fields are optional if "Log in with Username/Password" is enabled for your Company. When the user is created, an email will be sent to the users email address, containing a link to set a password. Note that users email address must be unique.
Connect new user to existing group
When choosing correct company for a new user, additional page information will show. Here you can add the user to an already existing group and choose users permissions for the given group (write/read/none). You can also check for if the user should be a super user for your company and check for “grant read access to all groups” for this specific user. Then press save.
Search and edit user
Go to page "User administration" at upper right corner. By default, ALL is selected for service and company, and if a particular user needs to be searched for, then start entering the name in search field and click enter. Choose a user from the list and edit.
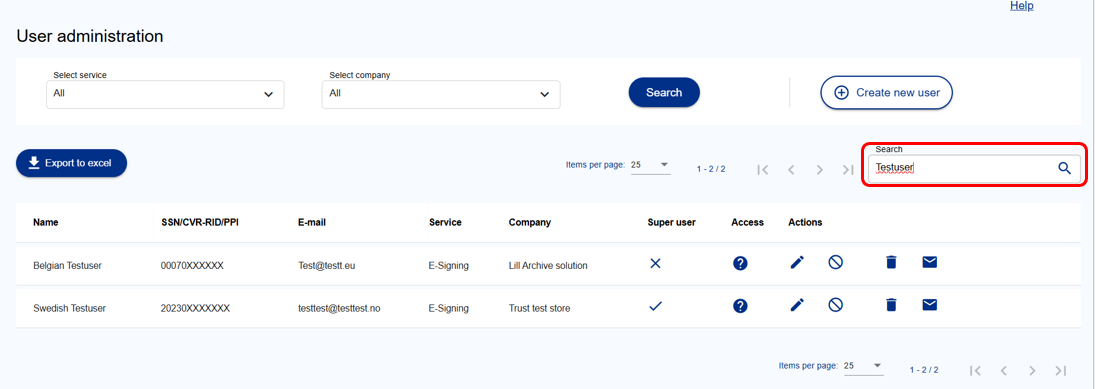
Action buttons for editing a user:
|
Action |
Description |
|---|---|
|
Edit |
Edit details for the user and connect the user to groups |
|
Activate |
Activate the user |
|
Lock/deactivate |
Deactivate the user, and the user will not be able to log on |
|
Delete |
Delete the user from the portal |
|
Resend password |
Resending the link that enables the user to create a new password. Email will be sent to the users registered email address |
Groups
To create a new group, go to menu item “Administration” in heading menu and choose “Groups”, then press button “Set up a new group”. Here the system will take you through the necessary steps.
-
Create group-> Enter the group name, and press “Next”
-
Add users -> Choose among existing users, and press “Next”
-
Connect notification->you can add an existing email template or create a new template and activate for the chosen group. Below are email template details
-
Getting a receipt for setting up a new group
Edit group
For Search and edit groups, go to Administration at heading menu and choose “Groups”. Then enter group name in search field, press enter and search will be done within the corresponding service and company. Choose the group to edit.
This section is about defining more detailed who to get notifications, internally (always inside your company) and externally (the signer's side).
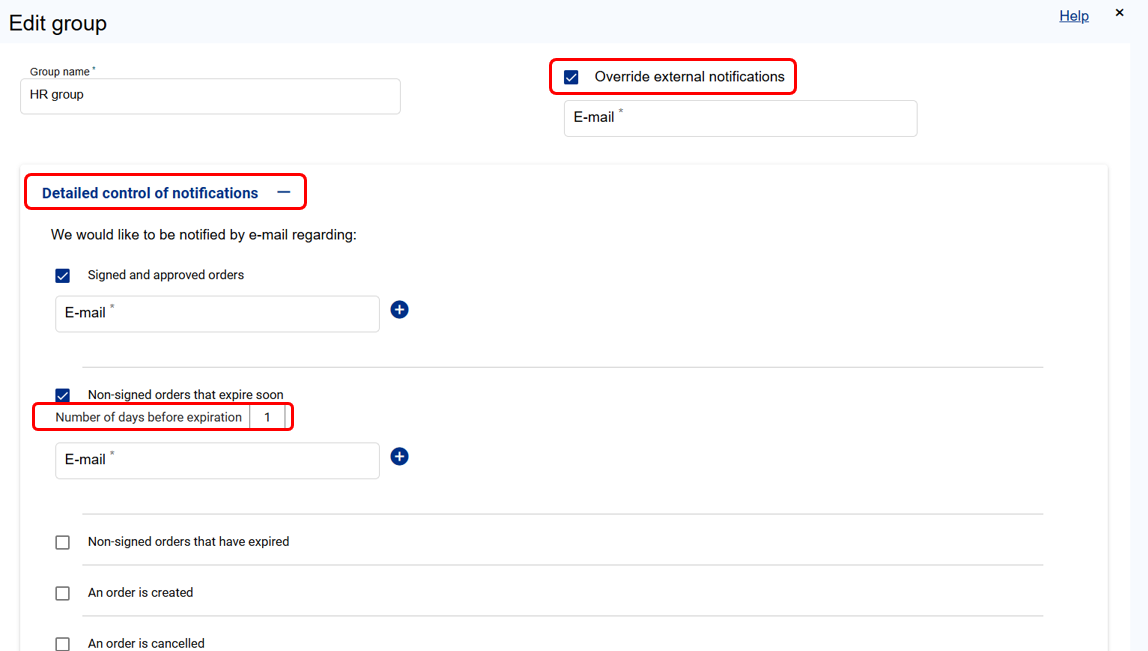
Using “Detailed Control of Notifications”, you can configure the internal notifications in more detail. Only the notification types that has been activated, and for which an email template has been defined, will be submitted for internal notifications. See "E-mail templates" below for details. You can select different email addresses for the various notification types. You may also assign multiple email addresses per notification type. In addition, you will be able to select how many days before expiration the reminder notification for a signing order shall be sent. The setting “Number of days before expiration”, also controls the external notification, but will only be used if there is an email template defined for the external notification.
Selecting the “Override external notification” option will cause all external notifications to be sent to a pre-defined address instead of to the Signer (Private market configuration) or Customer contact (Corporate market configuration).
There is one more setting related to external notifications. This is the setting controlling how many days before expiration the reminder notification shall be submitted. This setting is defined together with internal notifications, as described below.
Configure E-Signing
Trust Portal allows some of the general settings to be edited by a Super User. Go to menu item Administration at the top menu and then choose Configure E-Signing. The following settings are currently available:
|
Function |
Description |
|---|---|
|
General information to signers |
It is possible to add short general information to the Signers that will appear in signing flow. The information is entered in the form of a heading and text. You may see a preview of the dialog by clicking the preview button.
|
|
Upload logo to the portal |
Customize the portal appearance by adding a Company logo. Drag and drop the file or click on browse in order to upload a new logo. A preview of the logo is shown, but a better verification will be to inspect the new logo in the top left corner of the page, as the change is implemented immediately. Selected logo is also used in the signature dialog for Signers. |
|
Identification before signing |
If "Identification before signing" is enabled for your Company, a Super User can select these options:
If Identification before signing is set to mandatory, all orders will have this function enabled. If the function is set to optional, case workers will be given the option of adding Signing before identification for any order. Note: If your Company has not requested the Identification before signing functionality, your Super Users will not see this menu. |
|
Allow personal message |
By setting the “Allow personal message” to “Yes”, each user will be able to add a personal text to the notification message being sent to the Signer or Customer Contact. This will require the external notification email template to include the personal message merging field. |
|
Default eID |
In case your Company has requested access to multiply eID types, you can select that one of them shall be set by default when creating a new signing order, thus reducing the number of parameters required for creating the signing order. Depending on which eID types that has been activated for your Company, the valid options for the default eID setting are “Not Selected”, “BankID (NO)”, “BankID (SE), «Bank IDs (FI)», “Nets One time code”, “Verimi”, “Nets Passport reader”, “MitID”, “MitID Business” and “Nexus DA” |
|
Configure order name |
By setting “Configure order name” to “Yes” the system will auto-populate the order name field from the document name. If you set it to “No”, the caseworker needs to fill in the Order name manually |
|
Personal notification to caseworker |
By setting “Personal notification to caseworker” to “Yes” you let the caseworker choose (at create order page) to receive personal notifications about a signing order |
|
Allow PDF form |
By setting “Allow PDF form” to “Yes” you let the caseworker create a signing order containing PDF form. If the attached document is a PDF form, specific fields need to be filled out while creating the order, like add the checkmark to indicate it is a PDF form and then add instruction text in the field. Note: If the check mark for PDF with Form field is not added, the order will be created as a normal PDF and the signer will not be able to add any information |
|
Allow multiple documents |
By setting this to “Yes” the caseworker can create orders containing multiple documents. Set to “No” you are only allowed to create orders with only one document to be signed. |
|
Allow to provide signer role |
By setting this to “Yes” you allow the caseworker to add a signer role when creating an order, either by choosing a predefined role or enter a customized role. This is optional when the function is enabled for the portal, meaning that for one signer you could add a role and for another you don't fill out the field. |
|
Login type |
Here you can see available login types for your company. If both login types ("Login with country spesific eID" and "Login with Username&Password") are enabled for your company, you will see both. By selecting one/both, you provide access to the users to use given login type for your company. As a superuser you can restrict users to not use any of the login for your company. If "Login with Country Specific eID" is not selected, then none of the users can access your company when they login with country specific eID's. Same goes for "Login with Username & Password". Note: The logged in login type is always disabled and you cannot make changes to that login. If you have logged in to the E-Signing portal using country specific eID's, then you cannot make changes to this. If you fail to provide access for any of the login types, you can contact ING Admin at support. |
|
Signer receipt external
|
If you select the Signer receipt external option, all external Signers will receive an e-mail receipt with original and signed document attached. The original unsigned document is a PDF document while the signed document is an SDO file or a Signed PDF (PAdES). The signed PDF sent pr email to external, will never contain SSN. |
|
Signer receipt internal
|
If you select the Signer receipt internal option, the internal recipient (defined in the group internal notification list) will receive signed and approved notification with documents attached in an email. The original unsigned document is a PDF document while the signed document is an SDO file or a Signed PDF (PADES).
|
|
Redirect after completed signing |
If you would like to automatically redirect the Signers to a specific web page, you may enter a valid web address for this setting. If you leave the field blank, the user will not be redirected. After the Signer has successfully signed the document, a 10 second timer will start to count down, and the Signer will be redirected to the selected web page. The user may also click on the “Click here to continue” button in order to go to the selected web page before the timer reaches zero seconds. |
|
|
If your Company is registered with Company Signature enabled, a Super User can select from one of three settings related to this:
In case your company has access to eID types from more than one eID-provider, you must also select which eID type to use for company signatures. Note: Company signing will be disabled when used in combination with PDF Form signing. |
|
Include SSN in signed document |
If set to “Yes” we will automatically include signers SSN in PAdES if it is signed by using BankID (NO), MitID or MitID Business |
|
Recover signed pades |
If Recover signed pades is enabled for your company, the super user can enable/disable the service. |
|
Enable SMS |
If Enable SMS is enabled for your company, the superuser can enable/disable the service |
|
Deadlines |
A Super User can set default dispatch date and signing deadlines to be used for all created orders. This will prevent the User from seeing this information when creating an order. If Override is checked the caseworker cannot modify signing deadline in create order page and if unchecked, then caseworker can edit the details. Dispatch date: Today to 14 days Signing deadline: 90 days from today |
|
ID-Rights
|
If the ID-Rights service is enabled for your company, the Super user can enable/disable the service for the company by clicking the checkboxes for applicable country. Super user can also decide which country should be default at search page if the company has more than one country available. In addition, Super user must give each user specific access, by clicking check-box ID-Rights at Admin->User page. |
Appearance
It is possible to customize your Trust Portal appearance. This is done from the Appearance menu. The page is divided into two sections:
-
Logo to be used in the portal
-
General information to Signers
Add a logo to be used
It is possible to customize the portal appearance by adding a Company logo.
Drag and drop the file or click on browse in order to upload a new logo. A preview of the logo is shown, but a better verification will be to inspect the new logo in the top left corner of the page, as the change is implemented immediately.
Selected logo is also used in the signature dialog for Signers.
General information to signers
It is possible to add some general information to the Signers that will appear below the signing box.
The information is entered in the form of a heading and text. You may see a preview of the dialog by clicking the preview button.
In order to apply any of the changes you make to the portal, click on the bottom save button.
E-mail templates for notifications
In order to send out notification for signing orders, an email template must be created for each type of notification. It is possible to create several different templates for the same type of notification, and you then assign the various templates to different groups. There are 7 notification types, and they may be defined for both internal (inside your company) and external (ex. the signer) recipients. At the E-mail template page, you can create new templates or configure already existing templates, like edit, delete and connect to groups.
Create new template
In order to create a template, click on "Create new email template" (menu item Administration->E-mail templates) and a pop-up window will show.
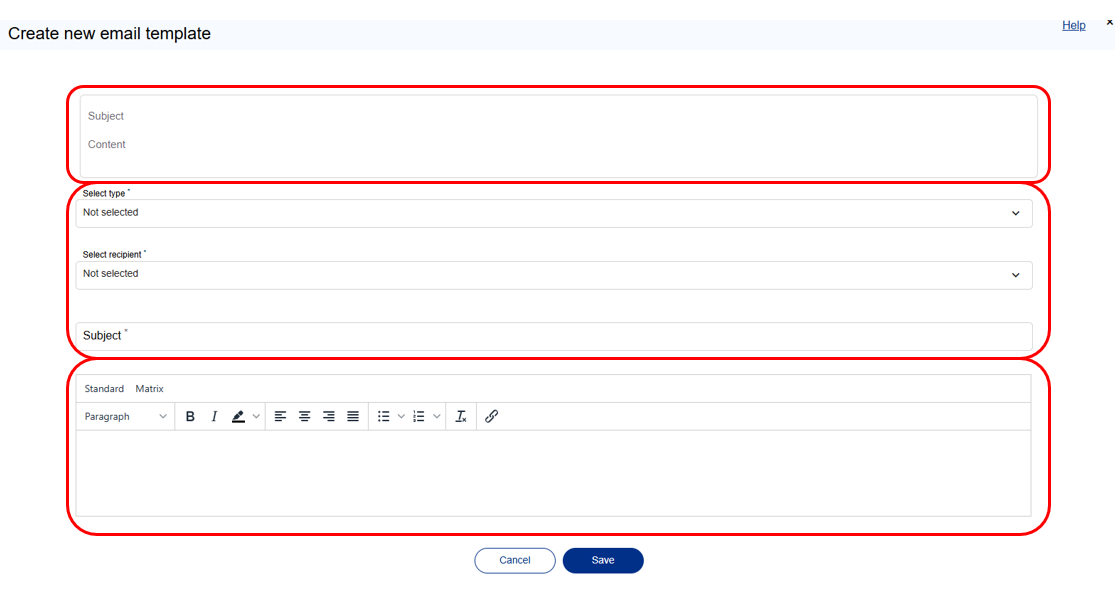
The first section gives a preview of the template as you add text in the template or edit it.
In the second section you select type (see below table) and recipient, Internal notification is for the caseworker, external notification for customer/signer. Fill out the Subject field for the email.
The third section is the content field.
Type of notification
|
Type |
Details |
|---|---|
|
Signed and approved orders |
Notification will be triggered when all signers have signed an order |
|
Non-signed orders that expires soon |
Reminder notification will be triggered when number of days before expiration is configured in "Groups" |
|
Non-signed orders that have expired |
Notification will be triggered when an order is not signed, and signing deadline is passed |
|
An order is created |
Notification email will be triggered when an order is created. Note that this one needs to be configured with recipient External, in order to send out a signing order |
|
An order is cancelled |
Notification will be triggered when a caseworker cancels an order |
|
Signer signs |
Notification will be triggered when one signer signs the order, in different to Signed and approved orders that is triggered when all signers sign an order |
|
Deadline modified |
Notification will be triggered when a caseworker change deadline |
Content
In the content field you can enter the formatted text in email template, and merge pre-defined standard values. You find the standard values in dropdown list at the top of the content field.
Standard merging values
Here is a list of pre-defined standard values that are available for merging in the content field:
|
Displayed name |
Merge key |
Description |
|---|---|---|
|
Signing deadline |
##DEADLINEDATE## |
Will include the signing deadline of the order |
|
Dispatch date |
##TRANSMISSIONDATE## |
Will include the date for sent out |
|
Name of case worker |
##COORDINATOR## |
Will show the name of the caseworker |
|
Case Worker personal message |
##PERSONALMESSAGE## |
Will include the personan message the caseworker add while creating the order |
|
Cancel by and reason |
##CANCELREASON## |
Will include who cancelled the order and the reason |
|
Your company name |
##COMPANY## |
Will include your company name |
|
Signorder description |
##DESCRIPTION## |
Will list the order name |
|
Signer name |
##SIGNERNAME## |
Will add the signer’s name as written in order creation |
|
Signer email*) |
##SIGNEREMAIL## |
Will show the signers email address |
|
Signer signing URL*) |
##SIGNERURL## |
Will include the signing url |
*) Signer email and Signer signing URL are only usable for Private market configurations.
Matrix merging values
|
Displayed name |
Merge key |
Description |
|---|---|---|
|
Signed matrix |
##SIGNERMATRIX## |
Will include the name or email of all signers with the date of signature per signer |
|
Unsigned matrix |
##UNSIGNEDSIGNERMATRIX## |
Will only list the names or email of all signers. The name or email field will include a hyperlink to the signing order for the signer |
|
Unsigned matrix (with URL field) |
##UNSIGNEDMATRIXVERBOSE## |
Will list the names or email of all signers with the full signing order URL next to each |
Here is an example of content field - email template for "An order is created" - External, using some of the standard values for merging:
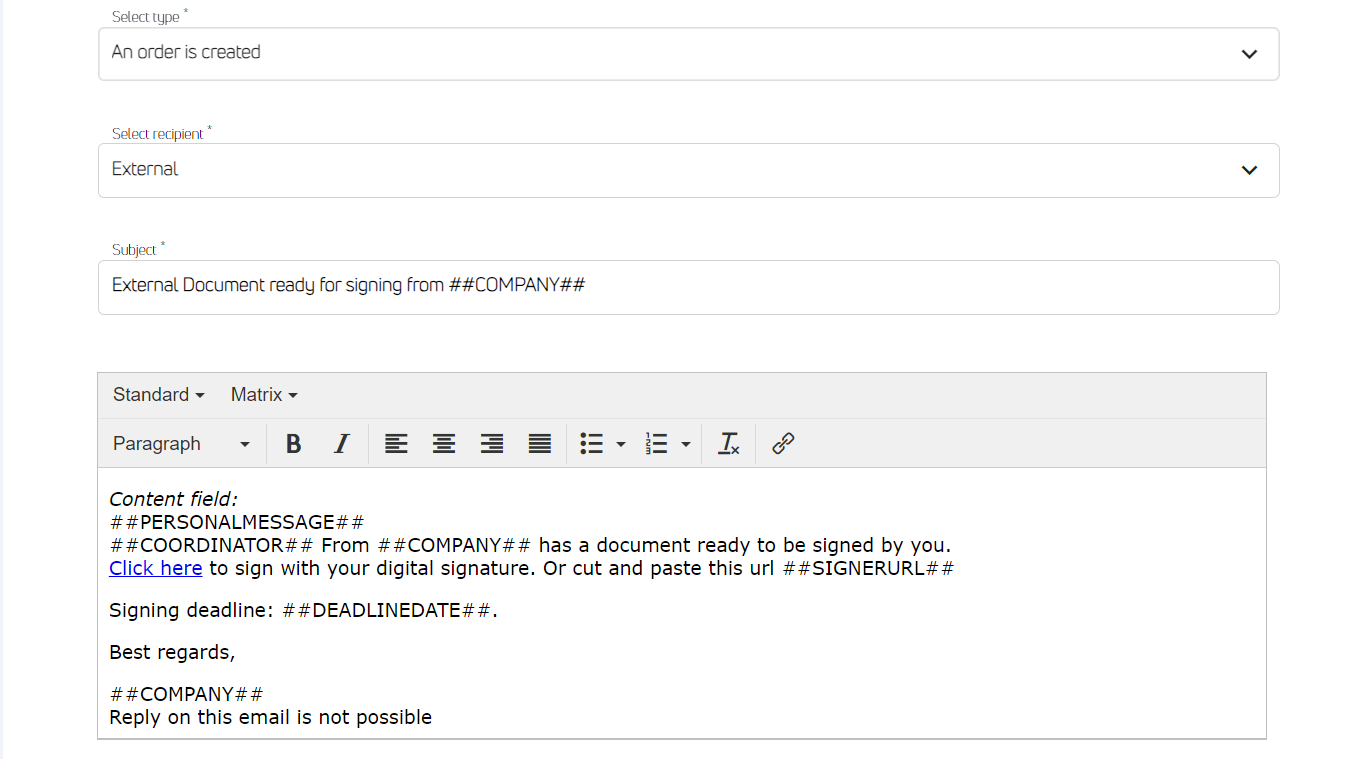
The preview will then be like this:

Edit existing templates
Go to Administration menu item and choose E-mail template. The list of all existing templates will show, listing subject, type and recipient as well as which groups each template has been assigned to. You can delete or edit any of the templates by click on the right-side buttons. Any template can be assigned to more than one group. When selecting Edit for a specific template you can edit type, subject, content and attached groups.
Archive templates
Archive templates are available for customers configured with access to ING Archive services. Multiple templates can be created, and they can be utilized in order to better ensure that the signing orders are created with the correct archive indexes, and the caseworker doesn’t have to fill inn every single detail when creating a new signing order.
A Super user has three main settings available at the top of the Archive template menu:
|
Function |
Description |
|---|---|
|
Use archive templates |
If No, the case worker will be required to set all Archive settings when creating a new signing order
|
|
If no matching document name, use default template |
If Yes: If the document uploaded by the case worker has a name that does not match any of the archive template names, the default template will be used. However, if the default template has not been enabled and configured, the case worker will not be able to continue registration of the signing order. In this case, registration of a signing order will only be possible if the uploaded a document name matches one of the archive template names |
|
Allow the case worker to select archive template |
If No: Each archive template is assigned a template name. If you don’t allow the case worker to select the archive template, the template name is used when the case worker uploads a document for a new signing order. The uploaded document name will be checked for matches against any of the registered archive template names. The matching test is done on the uploaded document name up to the first full stop, “.”, punctuation mark |
Create archive template
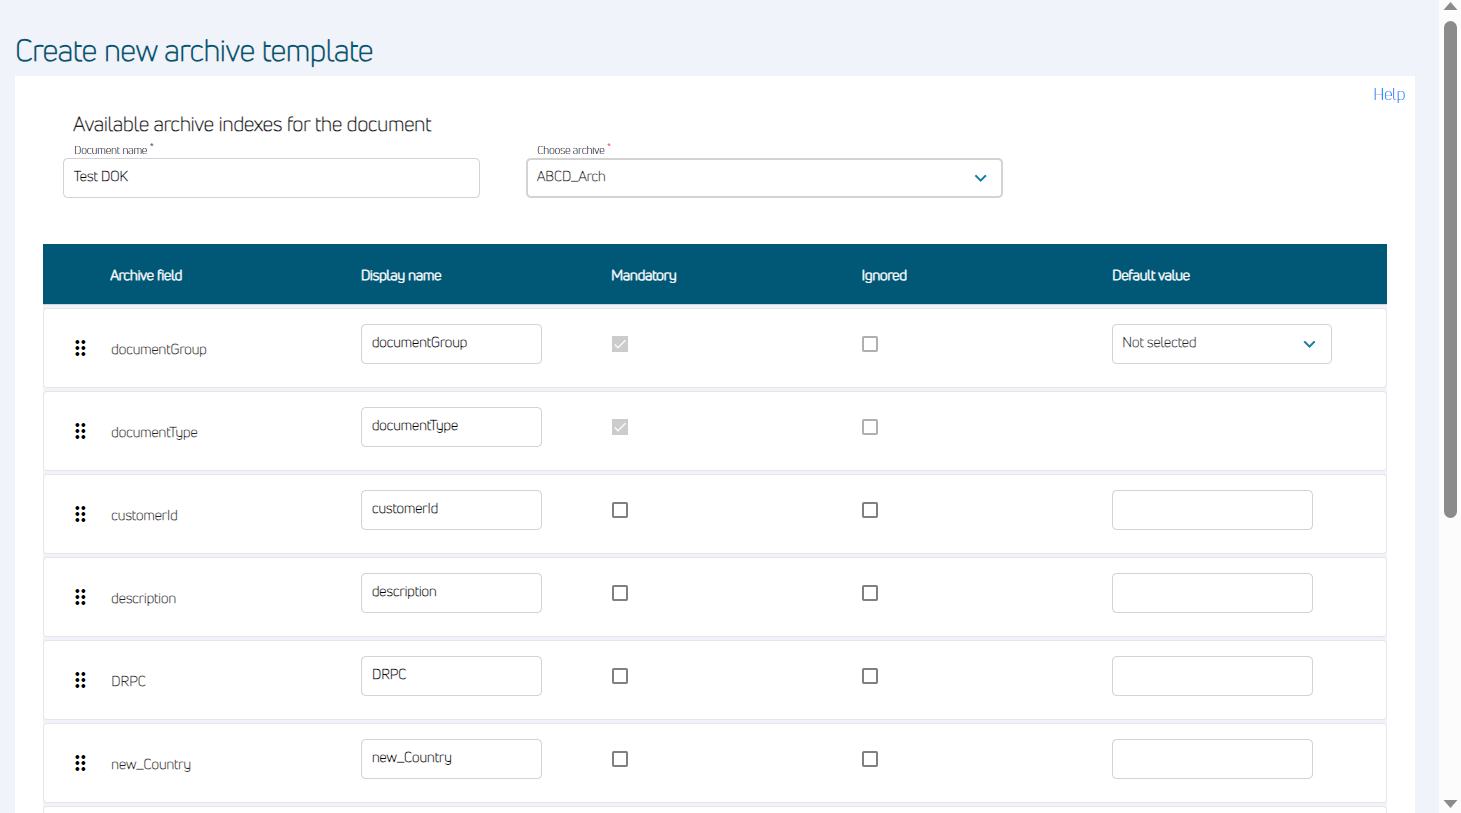
In order to create an archive template, click on the “Create new archive template” button. Enter a name and also choose from one of the archives available for your Company and after entering required configuration click on save. Next you will see the archive field configuration table, as shown below. The content of this table will strongly depend on the E-Archive settings defined for your Company.
|
Name/column |
Description |
|---|---|
|
Archive field |
States the official “Archive field” name for the index |
|
Displayed name |
May be used in order to show a different index name for the case workers. This field has no effect if the index has a default value or is ignored, as it will not be displayed to the case worker |
|
Mandatory |
Indicates if the index is required or not. Some indexes may already be set to required, as these indexes are required in order to archive the document correctly |
|
Ignored |
This is used to remove optional indexes that you don’t want to use |
|
Default Value |
May be used to lock the index to a fixed value. Any index with a default value will not be shown to the case worker |
Note:
-
The Documentgroup and Documenttype are special archive indexes and are set using drop-down menus.
-
Archive indexes support enumerated indexes. You can select from a predefined list of values when creating the archive template or when creating the signing order. Enumerated indexes are selected using drop-down menus, just like Documentgroup and Documenttype.